
There are many ways to deploy your Hugo website built with Blowfish. The theme is designed to be flexible in almost any deployment scenario.
Blowfish is built using relative URLs throughout the theme. This enables sites to easily be deployed to sub-folders and hosts like GitHub Pages. There’s usually no special configuration required for this to work as long as the baseURL parameter has been configured in the hugo.toml file.
The official Hugo Hosting and Deployment docs are the best place to learn how to deploy your site. The sections below contain some specific theme configuration details that can help you deploy smoothly with certain providers.
Choose your provider:
GitHub Pages#
GitHub allows hosting on GitHub Pages using Actions. To enable this functionality, enable Pages on your repo and create a new Actions workflow to build and deploy your site.
The file needs to be in YAML format, placed within the .github/workflows/ directory of your GitHub repository and named with a .yml extension.
branches and in the deploy step if parameter to the source branch used in your project.# .github/workflows/gh-pages.yml
name: GitHub Pages
on:
push:
branches:
- main
jobs:
build-deploy:
runs-on: ubuntu-24.04
concurrency:
group: ${{ github.workflow }}-${{ github.ref }}
steps:
- name: Checkout
uses: actions/checkout@v3
with:
submodules: true
fetch-depth: 0
- name: Setup Hugo
uses: peaceiris/actions-hugo@v2
with:
hugo-version: "latest"
- name: Build
run: hugo --minify
- name: Deploy
uses: peaceiris/actions-gh-pages@v3
if: ${{ github.ref == 'refs/heads/main' }}
with:
github_token: ${{ secrets.GITHUB_TOKEN }}
publish_branch: gh-pages
publish_dir: ./publicPush the config file to GitHub and the action should automatically run. It may fail the first time and you’ll need to visit the Settings > Pages section of your GitHub repo to check the source is correct. It should be set to use the gh-pages branch.

Once the settings are configured, re-run the action and the site should build and deploy correctly. You can consult the actions log to check everything deployed successfully.
Netlify#
To deploy to Netlify, create a new continuous deployment site and link it to your source code. The build settings can be left blank in the Netlify UI. You will only need to configure the domain you’ll be using.
Then in the root of your site repository, create a netlify.toml file:
# netlify.toml

[build]
  command = "hugo mod get -u && hugo --gc --minify -b $URL"
  publish = "public"

[build.environment]
  NODE_ENV = "production"
  GO_VERSION = "1.16"
  TZ = "UTC"  # Set to preferred timezone

[context.production.environment]
  HUGO_VERSION = "0.104.1"
  HUGO_ENV = "production"

[context.deploy-preview.environment]
  HUGO_VERSION = "0.104.1"
This configuration assumes you are deploying Blowfish as a Hugo module. If you have installed the theme using another method, change the build command to simply hugo --gc --minify -b $URL.
When you push the config file to your repo, Netlify should automatically deploy your site. You can check the deploy logs in the Netlify UI to check for any errors.
Render#
Deploying to Render is very straightforward and all configuration is via the Render UI.
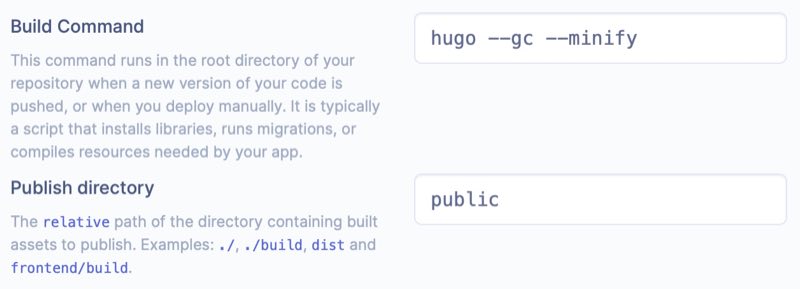
Create a new Static Site and link it to your project’s code repository. Then simply configure the build command to be hugo --gc --minify and publish directory to be public.
The site will automatically build and deploy whenever you push a change to your repo.
Cloudflare Pages#
Cloudflare offers the Pages service that can host Hugo blogs. It builds the site from a git repository and then hosts it on Cloudflare’s CDN. Follow their Hugo deployment guide to get started.
The Rocket Loader™ feature offered by Cloudflare tries to speed up rendering of web pages with JavaScript, but it breaks the appearance switcher in the theme. It can also cause an annoying light/dark screen flash when browsing your site due to scripts loading in the wrong order.
This problem can be fixed by disabling it:
- Go to the Cloudflare dashboard
- Click on your domain name in the list
- Click Optimization in the Speed section
- Scroll down to Rocket Loader™ and disable it
Hugo sites built with Blowfish still load very quickly, even with this feature disabled.
Shared hosting, VPS or private web server#
Using traditional web hosting, or deploying to your own web server, is as simple as building your Hugo site and transferring the files to your host.
Make sure that the baseURL parameter in hugo.toml is set to the full URL to the root of your website (including any sub domains or sub-folders).
Then build your site using hugo and copy the contents of the output directory to the root of your web server and you will be ready to go. By default, the output directory is named public.
If you need a hosting provider, check out Vultr or DigitalOcean. Signing up using these affiliate links will give you up to $100 in free credit so you can try the service.


